This year was going to be the year that I said the heck with it and didn’t have a garden. That lasted about 2 weeks then I knew I was just kidding myself! A garden is a MUST for us! We need to be able to eat fresh green onions, cherry tomatoes, and have plants to tend over the summer. What we knew that we didn’t want anymore was the garden Super Genius and I have been struggling with since we moved here five years ago. The ground here is awful, and while our old home had clay soil as well, we had amended it and it was wonderful garden soil. I’ve tried doing the same here but this ground really doesn’t want to grow anything but weeds for us.
So, with all the talk about raised bed gardens lately, I decided we should try something new this year. We are going to test out the Square Foot Gardening method that seems so popular these days. I don’t have the book but there is a bounty of information to be found online and the premise is simple enough. Today we got a good start by building raised garden beds to hold the vegetables and herbs we plan on growing this year.

Of course, there is a bit of a start up cost with this method of gardening because of the lumber needed, but we think it will be worth it in the long run. Two 4′ x 8′ beds should produce quite a few vegetables if we do it right. The total cost for the raised beds we built was $104.00, with $67.00 being for the lumber needed for the sides.
We bought:
- 3 – 2″ x 12″ x 16′ untreated boards (we had the man at Home Depot cut them all into 8′ lengths)
- 1 small box of 3″ wood screws
- 6 – 1/2″ x 10′ PVC pipe lengths
- 24 – metal pipe clips
Already on hand we had:
- 2 sheets of 4′ x 8′ plywood board
- 6 – 2″ x 6″ x 8′ boards (scrap leftovers)
- Garden Twine (for making grid – will do after soil)
- flat thumbtacks (for making grid- will do after soil)
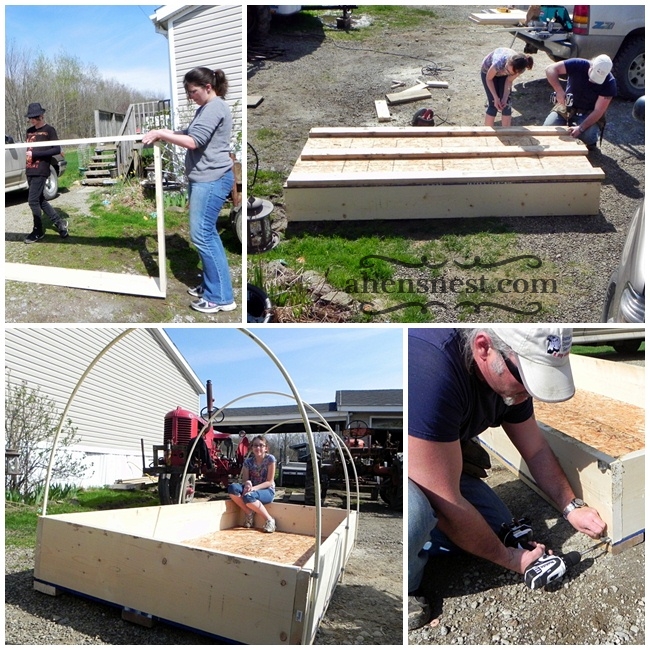
The construction of the beds is extremely simple. We cut two of the 8′ boards from Home Depot into four 45″ lengths (for the ends). Then we pre-drilled three holes at the ends of each of the long 8′ side pieces and screwed these to the the 45″ end pieces to form a box.
Then we placed a sheet of plywood on the bottom of each box and attached with 1 1/2″ screws all along the sides. Since our raised beds are being made to be portable, we wanted them to sit off the ground just a bit. We screwed three 2″ x 6″ x 8′ boards, evenly spaced, onto the bottom of each of the boxes.
To make sure our raised gardens have good drainage we used a 1/4″ paddle bit and drilled holes (one per every square foot) into the plywood bottoms before turning the boxes upright.
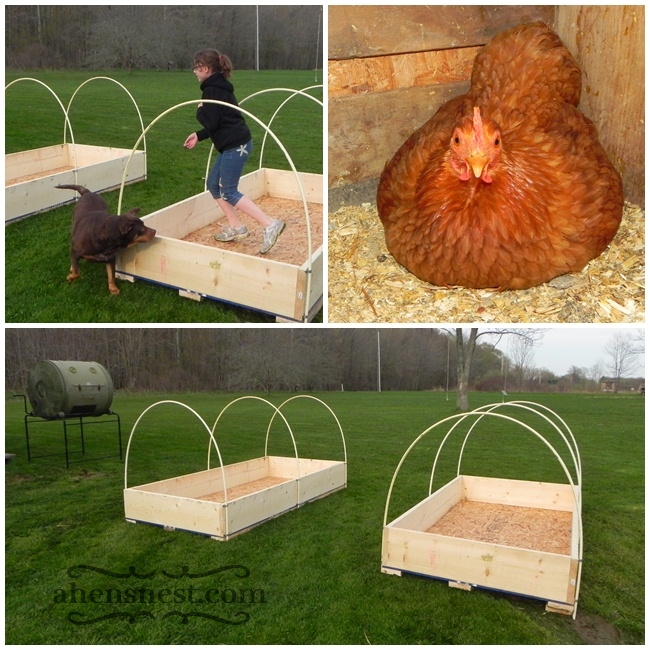
Something I have always wanted to build was a cold frame so I thought why not make my raised beds do double duty. We attached 2 metal pipe clips (make sure they fit your PVC!) onto each outside corner, and in the center of, each of the bed sides. Six 1/2″ PVC pipes make the perfect hoop frames for plastic row covers so we can extend our growing season. They can removed and stored when not needed too!

All that’s left now is to purchase our soil. I am thinking of getting some good mushroom compost, horse manure for raised beds, or something similar to fill them with. I’ll keep you updated and will also share our garden plan when I have it all plotted out! Hopefully we’ll have some seeds and plants in by next weekend if we don’t get rained out! What are your gardening goals this year?


That seems like such a smart idea! I’m sure many people have problems with their soil. Now is there anything you can recommend for my black thumb? I think I can kill a plant just by looking at it. :P
Aw Karen! I would say just keep trying! I have the best luck with plants that thrive on neglect! Wildflowers and plants that are native to your area are usually the best bet! Lilies, hostas, perennial herbs, and Bea Balm are soem of my favorite outside plants.
I knew you would figure a way to grow vegs. this year.I knew you could not go even one year without a garden, because you love to get in the dirt to much..lol.. Great thinking on your part. And you got the whole family in on it! Good-Luck on your vegs. garden this year!:)
I know mom, i really can’t NOT have fresh veggies of some sort! I think our raised beds are really going to be fun to garden in this year!
I am trying square foot gardening this year too–I hope we both have good luck with it! It seems easy enough and it makes sense to me. Last year I had a plot in a community garden and the soil was awful and nothing we did made any difference.
That’s awesome! I’ve been wanting to create some raised beds for a garden this year. I haven’t gotten that far yet, but have made a great home made green house using salvaged windows :)
Oh I’ve always wanted to do that with old windows! I’m running over to your blog see if you have any pics :)
this is perfect for our tiny backyard, thank you for the inspiration!!
Hello. I’m grateful for the contents received from your website.Now I’m learn about this and just be able to apply knowledge to real life applications. Finally, Thank you very much.
This is PERFECT!!! I have been looking for an easy way to make some raised beds for our garden. My hubby wants to connect our two 4×8′ beds to make one 12×8′ bed. I’m not down with that because I don’t like to have to walk through the planting area. I prefer to walk around it. This would be absoultely perfect for us. He doesn’t have to worry about spewing grass into my garden when he mows between them, they can be moved, and the supports will work for plastic sheeting or bird netting! Thanks for sharing and THANK YOU for the supply list!
I’m so glad you found this helpful! this will be our third year using these beds and they are still holding up very nicely! All of our plants do very well in them with herbs and tomatoes really taking off. I liked this design because I can reach every part of the garden from all sides without hurting my back. If I were to make them again, I might put a flat board along the edge of the top, for comfier sitting :)
I hope you have a wonderful garden this year!