This is a sponsored conversation inspired by the Canon PIXMA MG7120. All thoughts and opinions are genuine and 100% my own. For more information on the new Canon Wireless Inkjet Photo All-In-One printers, visit usa.canon.com/pps.
Life can get so hectic with kids in school, holidays looming and the general busyness of everyday life. I know that I often forget to stop and appreciate everything good that we have going on. During this season of Thanksgiving, I wanted to create something tangible that would remind me of what I should be thankful for most of all — my wonderful, irreplaceable, and crazy family!
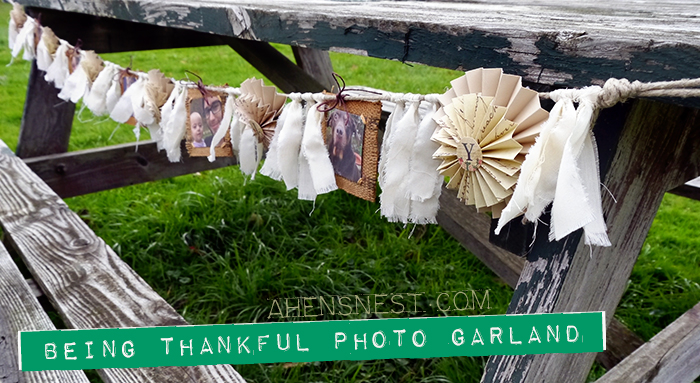
I decided to incorporate family photos in my project and when I came up with a paper and burlap photo garland, I knew it would be an eye catching decoration piece all year long. I enjoyed partnering with Canon to use my new Canon PIXMA MG7120 Wireless Inkjet Photo All-in-One Printer as the inspiration to create this crafty reminder of what I have to be thankful for! I was easily able to print out the Instagram and smart phone photos I needed to use for this project
Thankful Photo Garland Supplies List:
- thick burlap
- cardstock in your color choice
- family photos
- decorative paper or scrapbook paper
- thick hemp cord or rope
- thin jute cord
- cotton or muslin fabric
- hot glue gun
- Canvas needle
Let’s get started!
Making a decorative paper & burlap garland
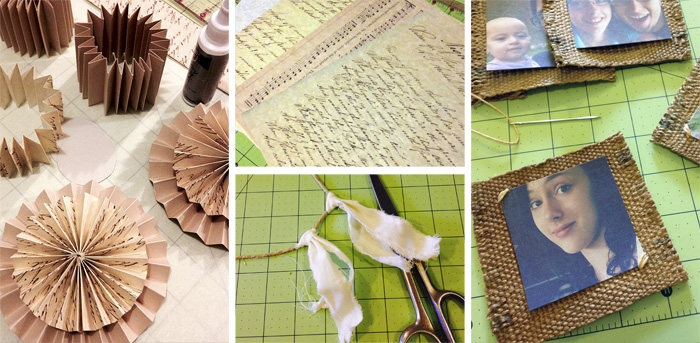
First, I used my PIXMA MG7120 Printer to print out a sheet of five favorite photos. The photos were sized at 2 ½” square and I printed them onto matte card stock. Even though my photo originals weren’t the best quality – thanks to my PIXMA — they turned out really well on the matte paper. You could also print them onto matte or glossy photo paper.
Size your photos as big or small as you like. Since mine were 2 ½” square, I cut the burlap a bit larger at 3 ½” square. Be sure to use fray check on the edges of the burlap, just to keep them from unraveling further. Using glue dots to hold the photos in place on the burlap, tack down the corners of the photos with a few overcast stitches in a complementary color of jute cord.
To make the six decorative paper accordion flowers — cut:
- six 2″ circles out of cardstock
- twelve 2″ x 11″ strips out of colored cardstock
- twelve 1 1/2″ x 11″ strips out of a decorative paper
I made my own decorative paper by printing free sheet music and penmanship graphics that I found online. I just enlarged the graphics and printed them onto parchment specialty paper for a vintage look. Using my MG7120 printer’s borderless photo option made the images extend across the paper while keeping the prints nice and crisp.
Take each strip of paper and make ½” folds along the length of each one. Attach two strips together to form one long strip then attach the ends to create a circle. Do this with all of the strips. You’ll end up with 6 of each size. Aleene’s Quick Dry Tacky Glue is perfect for impatient folks like me!
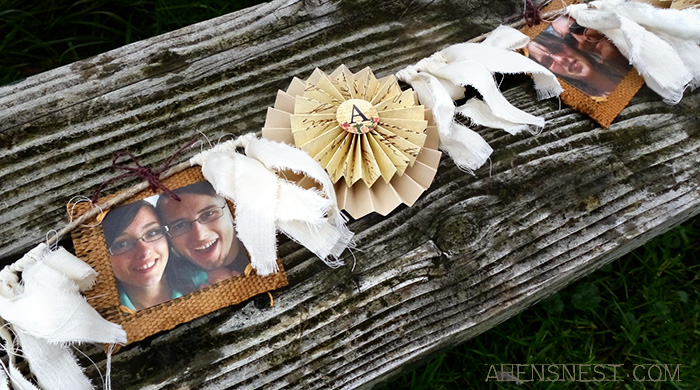
After the circles are dry, gently flatten each one by pushing the top down towards the center — put a dab of hot glue in the center to hold. Glue a cardstock circle to the center back of each large flower. Hot glue one small flower to the top of each larger cardstock flower. To spell out the word “FAMILY,” I used a print out of vintage letters I had previously bought on Etsy. You can easily create your own — just use a graphic program to make 1″ circles and place a letter inside each circle. Glue one letter to the center of each flower.
Alternately, you could hot glue large vintage buttons to the centers of each flower — this would look adorable and really add some personality!
Tie a double knot on one end of the thick hemp cord, leaving a loop for hanging. To add a soft rustic touch, I tore cotton fabric into 1″ wide strips and knotted them all along the cord. You could also add twine, yarn, jute or even ribbon for added color — I wanted to keep mine in neutral colors so I didn’t add any extras.
Using more of the jute cord, tie the burlap photo frames onto the hemp cord. Then, hot glue the paper flowers directly to the cord (this is where that paper circle on the back really helps the hot glue stick to the cord!) Alternating the photos with the flowers makes for a nice symmetrical look. You can always add more knotted fabric strips if your garland is looking too sparse. Tie another double knot with a loop at the opposite end and your garland is ready to hang!
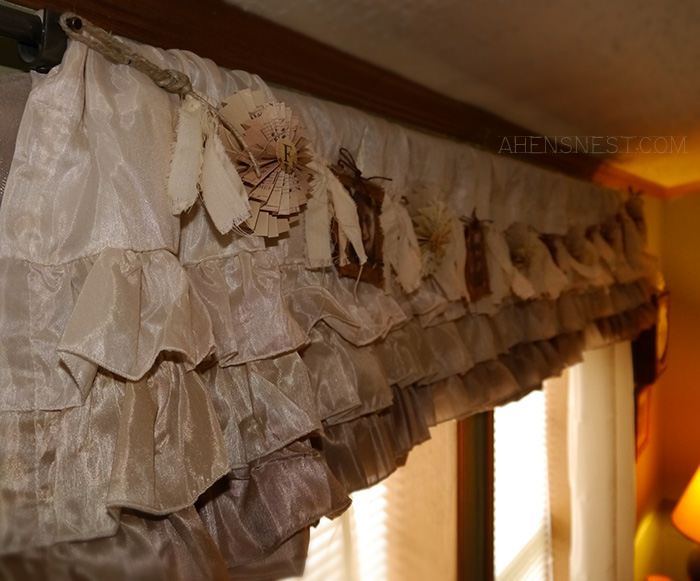
I absolutely love my photo garland as a window decoration. It looks so pretty with my ruffled valance — they’re the same soft shades of cream and browns! I think I’ll make another shorter garland with the word “LOVE,” to decorate the wall above the TV set!
How do you remind yourself to slow down and be thankful for the people in your life?


That is seriously cute. You should make them and sell them on Etsy. Just have people upload their pictures to you and you could assemble them & probably make a small fortune.
Thanks Robin! But I will tell you what I always tell my mom when she thinks I should make more of something… I hate making things twice. I get very bored if I have to make things more than once and it becomes more like work than fun! Plus, those accordion flowers are kind of a pain.. I would have to hire someone to make a ton of them, ha!
What a great photo craft! I love how this photo garland turned out! I never would have thought to do this.
i gasped. literally. i absolutely adore this. so beautiful!!
Thank yo uso much Brett! I was really pleased with how it turned out! I need to make more =)
This is awesome. I love how you incorporated your family into the garland. So creative there. Um, I really need to learn to slow down, but weekends are my slow down time to spend with my family!
I love the idea of this photo garland! The fabric and burlap complement each other perfectly, and it’s a great way to display your favorite photos.
Wow, that is just beautiful. But I can tell you right ow, there is no way I would ever do that much work! Perhaps that is why I do not have a DIY blog. My artful son on the other hand might!
thanks,
Mitch
This is beautiful! I love everything about it. I really like the fact that you printed your own paper. I would love a printer that had a no margin setting. I have wanted that feature for YEARS! Thanks for the tutorial on the accordion flowers also. I didn’t know how to make them, but I love them. I think I may make something like this to hold Christmas cards.
Thanks Katy! I had a lot of fun making the garland and since I printed my own paper, it looks just how I wanted it to! Those flowers are fun to make, they do take a while but they were so worth it. Ooh, I hope you post it if you make one for Christmas cards, I want to see it!
I love when people decorate their home DIY style. I never thought of making a Photo Garland will definitely be pinning this post!
This is adorable! Would be great at a wedding!
How do I slow down? Hmmm… I have to make a conscious effort.
And I absolutely love how that looks. As soon as I saw it I said “that looks just like her!” Is absolutely perfect with your decor.
Very cool post too. :-)
That is a fabulous garland.
And, usually, it’s my kids that remind me to slow down. They need my attention and I need to be good about giving it to them.
I enjoyed the rustic and artistic crafts shown in the pictures. Also I love the pictures shown too as they look professionally done.
Oh this is beautiful! And so unique too! I love it!
Those are great, and I would laminate the pictures too, just to keep them safe from spills (not that I have a little guy in the house or anything). ;) I enjoy my family, but I could always slow down a little more, that time that we lose being busy doesn’t come back.
That\’s a cool garland. I think it would be neat for a country wedding with photos of the bride
This is so cute and unique. I love it!
The printer sounds great- I just bought a PIXMA and have yet to try it out for anything other than regular document printing. I should try!! Love the photo garland too :)
Oh, I love this so much! What a great addition to a home. I’m so thankful for my family, I’d love to make this. That printer seems so useful.
What a gorgeous rustic banner! Love the creativity of the burlap and fabric.
Gorgeous! I’d leave this up year-round.
I wish I was that clever! Thanks for the lesson :)